1. how to use paypal for payment processing and payout ?
TicketGateway Payment Processing is the default way to receive payments on TicketGateway, but you can also link your PayPal account to your event to process payments. After setting up an account with PayPal, head over to your event's “Manage” page (on TicketGateway) and select “Payment Options.” Choose "PayPal" as your payment processor, then enter your PayPal account email address to accept payments with PayPal.
1. Start Creating A New Event On TicketGateway

After signing up or logging in, select "Create Event" at the top of the page. This brings you to the first part of creating your event, called “Edit”.
2. Go To Set Payment Options
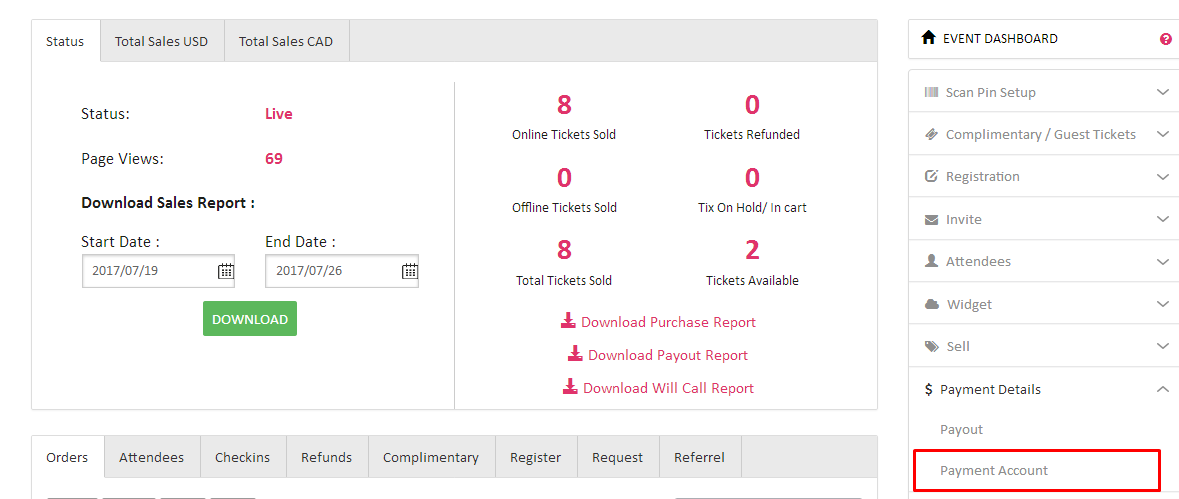
3. Set PayPal As The Payment Processor
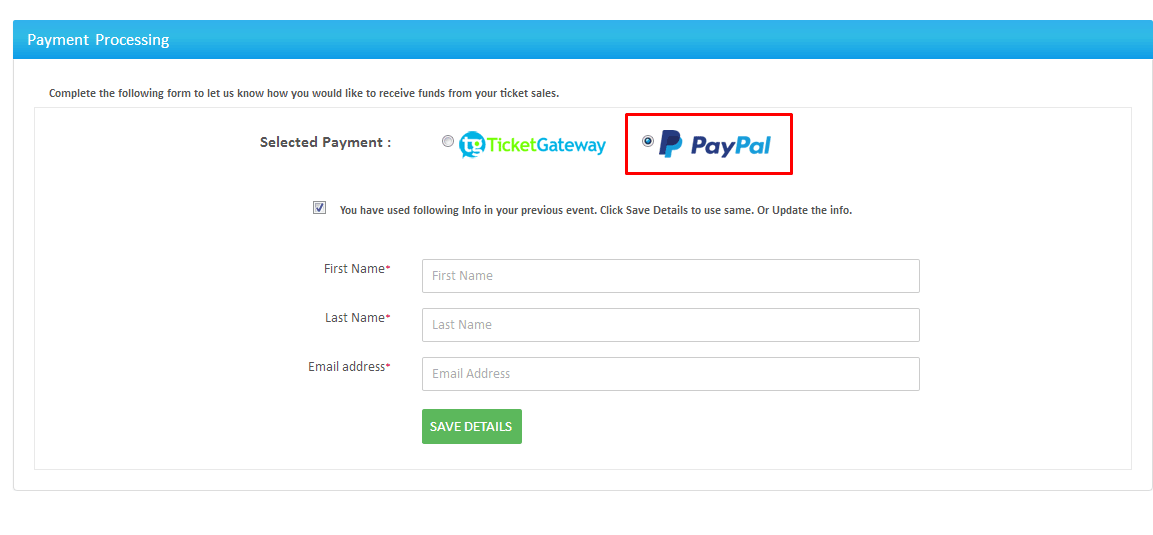
The payment processor will be set to TicketGateway Payment Processing the first time you create an event, but you can use the drop-down menu to select "PayPal" instead.
4. Enter Your PayPal Email Address

Click or tap in the field under "PayPal Premier or Business account email" to type in the email address tied to your Premier or Business PayPal account. Make sure to enter this email correctly—this is how you will receive the money for your ticket sales!
5. Save Your Changes
Choose "Save" to change your payment processor to PayPal. When attendees register on your event listing, they will be taken to PayPal to complete their purchase, and payments (excluding PayPal and TicketGateway fees) will go directly into your PayPal account.
2. How to process refunds with PayPal ?
You can issue a full refund for an order using "Refund this Order" in the "Actions" drop-down menu (when viewing the Orders report). If you are using PayPal, you will need to click "Initiate Refund" to complete the refund from within your PayPal account.
This should come in handy if you are looking to cancel your event.
1. Go To Your Event Dashboard
After logging in, click "Manage" next to your event from Manage Events.
2. Go To Orders (Under Manage Attendees)
“Manage Attendees” is located near the bottom of the menu on the left-hand side of the page.
3. Search For The Order
Find the order you would like to refund in the "Search for Orders" field by order number, name, or email address.
4. Use “Refund This Order” From Actions
Select "Refund this Order" from the "Actions" drop-down menu located next to the order.
5. Click “Initiate Refund” (To Redirect To PayPal)
Since you are using PayPal for payment processing, you will be redirected to PayPal to complete the refund. Any refunds you initiate in your PayPal account automatically update orders in your TicketGateway account.
6. Optional: Issue A Partial Refund
If you need to issue a partial refund—either a partial amount for an order or one of multiple tickets on the same order—you can do so once in PayPal.
After you select "Initiate Refund" and are directed to PayPal, log in and simply enter the amount you would like to refund when issuing. Then return to the order in your TicketGateway event and select "Refund this Order" from the "Actions" drop-down menu.
Finally, click "manually update" to reconcile the order in your event's reporting.
3. How to request a refund for an order purchased with PayPal ?
TicketGateway organizers set their own refund policies. If you would like to request a refund, first check the event listing to see if the event organizer set a refund policy. To request a refund, go to “Tickets” in your TicketGateway account (go here if you have never logged in before), find your order, and then select "Request a Refund." They should respond within 2 business days (1 week if you did not pay using PayPal) and when issued, refunds can take up to 5 business days to show on your account (7 business days outside the U.S.). If it has been 2 business days since you contacted the organizer, you can reach out to PayPal for further assistance. Search for "How to Dispute a Transaction" to learn more about their dispute resolution process.
1. Check The Event’s Refund Policy
TicketGateway lets organizers set their own refund policies, so in most cases, you will want to check the policy first before reaching out to the organizer or TicketGateway. The organizer can choose to list their refund policy within the event details, ticket descriptions, order confirmation messages, and/or PDF tickets.
2. Find Your Order On The Tickets Page In Ticketgateway
After you log in to your TicketGateway account (go here if you have never logged in before), access the account menu, and select “Tickets” to find your order.
3. Choose "Request A Refund"
Select "Request a Refund” to get started.
4. Fill Out The Contact Form And Select “Continue”
Your name, email address, and contact reason will already be filled in for you. Use the drop-down menu under “Refund Reason” to choose a reason for your refund, and then write a short message explaining your request. Hit “Continue” once every field is filled out.
5. Review Your Request And Hit “Submit Refund Request”
Check the information on your refund request to make sure everything looks correct. Then click “Submit Refund Request” to send your request to the event organizer.
If you need to make changes to your refund request before submitting, just click “Edit Information” to go back.
6. Track Your Refund Request
You will receive a success message letting you know your refund request was submitted to the organizer. Hit “Track Refund Request” to go back to your order details and track the status of your request. You will see a notification and you can click “View” to see the details of your request.
7. Wait 2 Business Days
Organizers using PayPal to collect payments for their events should respond to your request within 2 business days.
If you do not receive a reply from the event organizer after 2 business days of your request, you can dispute the transaction via PayPal's "Disputes" process.
8. Wait Up To 7 Business Days To See Your Refund Once Issued
When a refund is issued, it can take up to 5 business days to show up in your account (7 business days internationally) depending on the bank or credit card company.
If you still do not see the refund after this time, contact PayPal to confirm it was processed.
Credit card companies use major banks to supply the funds they lend to cardholders to make purchases, which means that the credit card's policies as well as the bank's policies can delay the refund.
9. Optional: Contact PayPal For Assistance
PayPal can be contacted via phone at:
- Business Account holders: 1-888-221-1161
- Personal or Guest Account holders: 402-935-7733
11. Optional: Check Out PayPal's Customer Support Help Page For More Information
The PayPal Customer Support Help page can be referenced here.
4. Comparing payment processing options
You can choose between TicketGateway Payment Processing and PayPal to process payments for your events. From your event’s “Manage” page, choose “Set Payment Options” to see all your available payment processor options.
TicketGateway Payment Processing
TicketGateway Payment Processing is the default way to accept ticket/registration payments online (and the smoothest experience for both you and your attendees).
- Attendees stay on the TicketGateway site to complete their purchase (easy for them), and there is a significantly higher attendee purchase conversion rate than PayPal (more sales for you).
- The processing fee is just 2% of the value per transaction in Pounds Sterling, and all fees are collected automatically (no monthly invoices to pay).
- There is nothing to set up—just tell us how you would like to be paid, and we will send it along 4-5 days after the event. You can also request an advance payout.
- We are PCI compliant, so you know your transactions are secure.
- Refunds are easy to handle, and all fees are returned.
NOTE: When using TicketGateway Payment Processing, the following is also available to attendees when paying for tickets to events:
- Germany and Austria: SEPA Direct Debit, SOFORT
- The Netherlands: SEPA Direct Debit, iDEAL
Learn more about how to set this up for your event.
PayPal
PayPal can be used for events in any country TicketGateway Payment Processing is available.
- Attendees are redirected to PayPal's website to complete their purchase (they are often prompted to log in to PayPal in order to submit payment—see the PayPal purchase process here).
- The PayPal processing fee varies by country/currency and is subject to change at PayPal's discretion.
- We will invoice you for the TicketGateway service fee you collect for the tickets you sell each month.
- Only the TicketGateway service fee (not PayPal's processing fee) can be passed on to your attendees, and PayPal doesn't return their full fee if you process refunds.
- Provide your PayPal email address to start accepting payments and get paid. (If you are a new PayPal user, you will need to follow PayPal's instructions to verify your account before you can receive any money into your bank account).
- Funds are deposited into your PayPal account immediately after a purchase is completed, although it may take a few days for the funds to show in your bank account.
Learn more about how to set this up for your event.
5. What does the checkout process look like with PayPal ?
Purchasing tickets for an event using PayPal is simple for attendees and only takes a few steps. They just select “Get Tickets,” pick a ticket type, enter any information you are collecting, and then complete their purchase on PayPal's website. Attendees can pay using their PayPal account or check out as a guest, and you and your ticket buyers will each receive an order confirmation email when orders are completed. Then they can access their tickets from the PDF attachment in the email, the “Tickets” page on their TicketGateway account, or on the TicketGateway mobile app for iPhone and Android.
Registering for an event will appear as below.
1. Attendees Go To Your Event Listing
When attendees reach your event page, they will see all the details you have set up, including the location, date, time, and description.
You can also make your event private so people cannot find it online, then send out email invitations to attendees.
2. They Select “Get Tickets” And Choose Tickets To Check Out
Attendees select “Get Tickets” and – after they enter any promotional codes you have provided – they select the drop-down menu to choose the number of tickets they want. Then they select "Checkout."
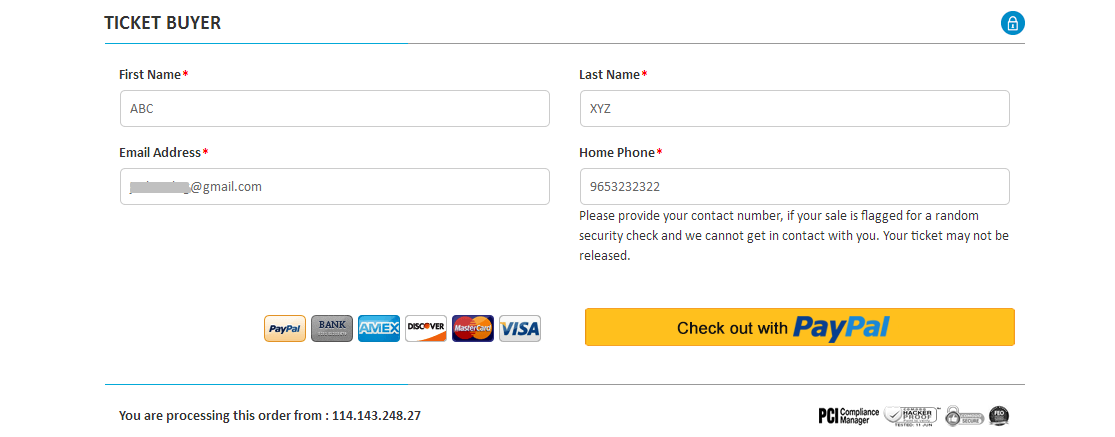
3. Ticket Buyers Fill Out Registration Information And Select “PayPal Check Out”
Ticket buyers go to the event registration form, where they can see a summary of their purchase, and provide registration information for each ticket holder (as well as any other information you've required).
If attendees are logged into their TicketGateway account, most of this information will already be filled in for them.
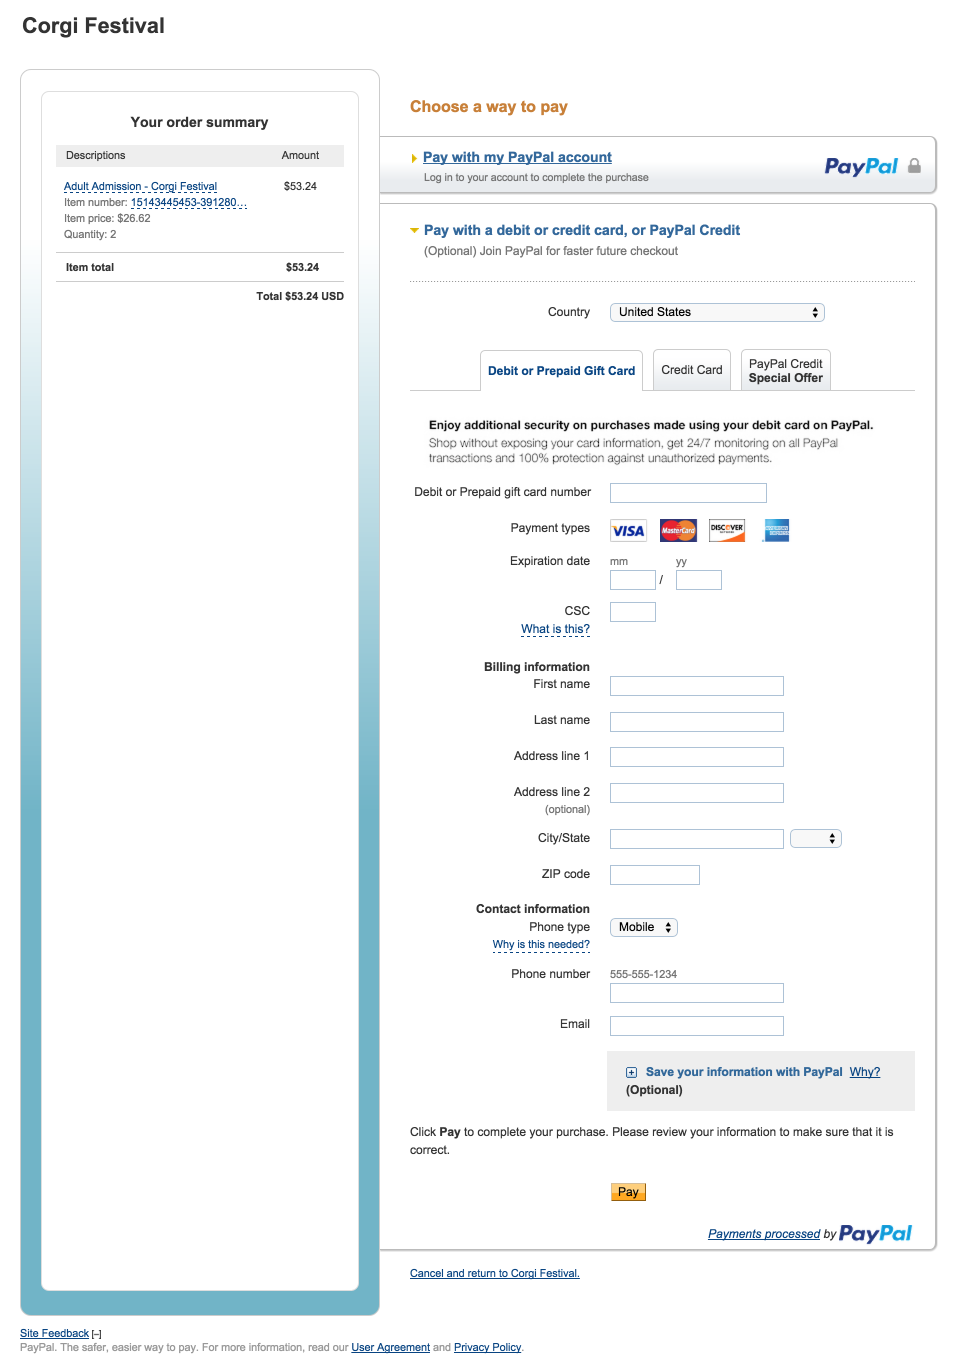
4. Ticket Buyers Fill Out Billing Information On PayPal's Website
Ticket buyers are taken to PayPal's website, where they will see a summary of their purchase. To complete their order, they can log into their PayPal account, or simply pay with a debit/credit card.
5. Ticket Buyers Select "Pay" To Complete The Order
After reviewing the information they have entered, attendees select "Pay" to complete their purchase. Once the order has gone through, they are taken to an order confirmation page, which you can customize.
6. You And The Buyer Receive An Order Confirmation Email
Attendees receive an order confirmation email from TicketGateway as well as a PayPal receipt after successfully placing their order. You will also receive an order notification email when attendees complete an order for your event (though you can choose to disable this).
7. Attendees Can Access Their Tickets
Attendees can print their ticket from the PDF attachment in their order confirmation email, or from the Tickets page in their TicketGateway account.
They can also present their tickets when logged into the Ticketgateway mobile app for iPhone or Android.
8. Payments Are Sent To Your PayPal Account.
Payments are immediately sent to your PayPal account, including TicketGateway fees. At this point, you can manage attendee orders right from your TicketGateway account, like resending order confirmations or issuing refunds.
6. How to turn off the PayPal account requirement option ?
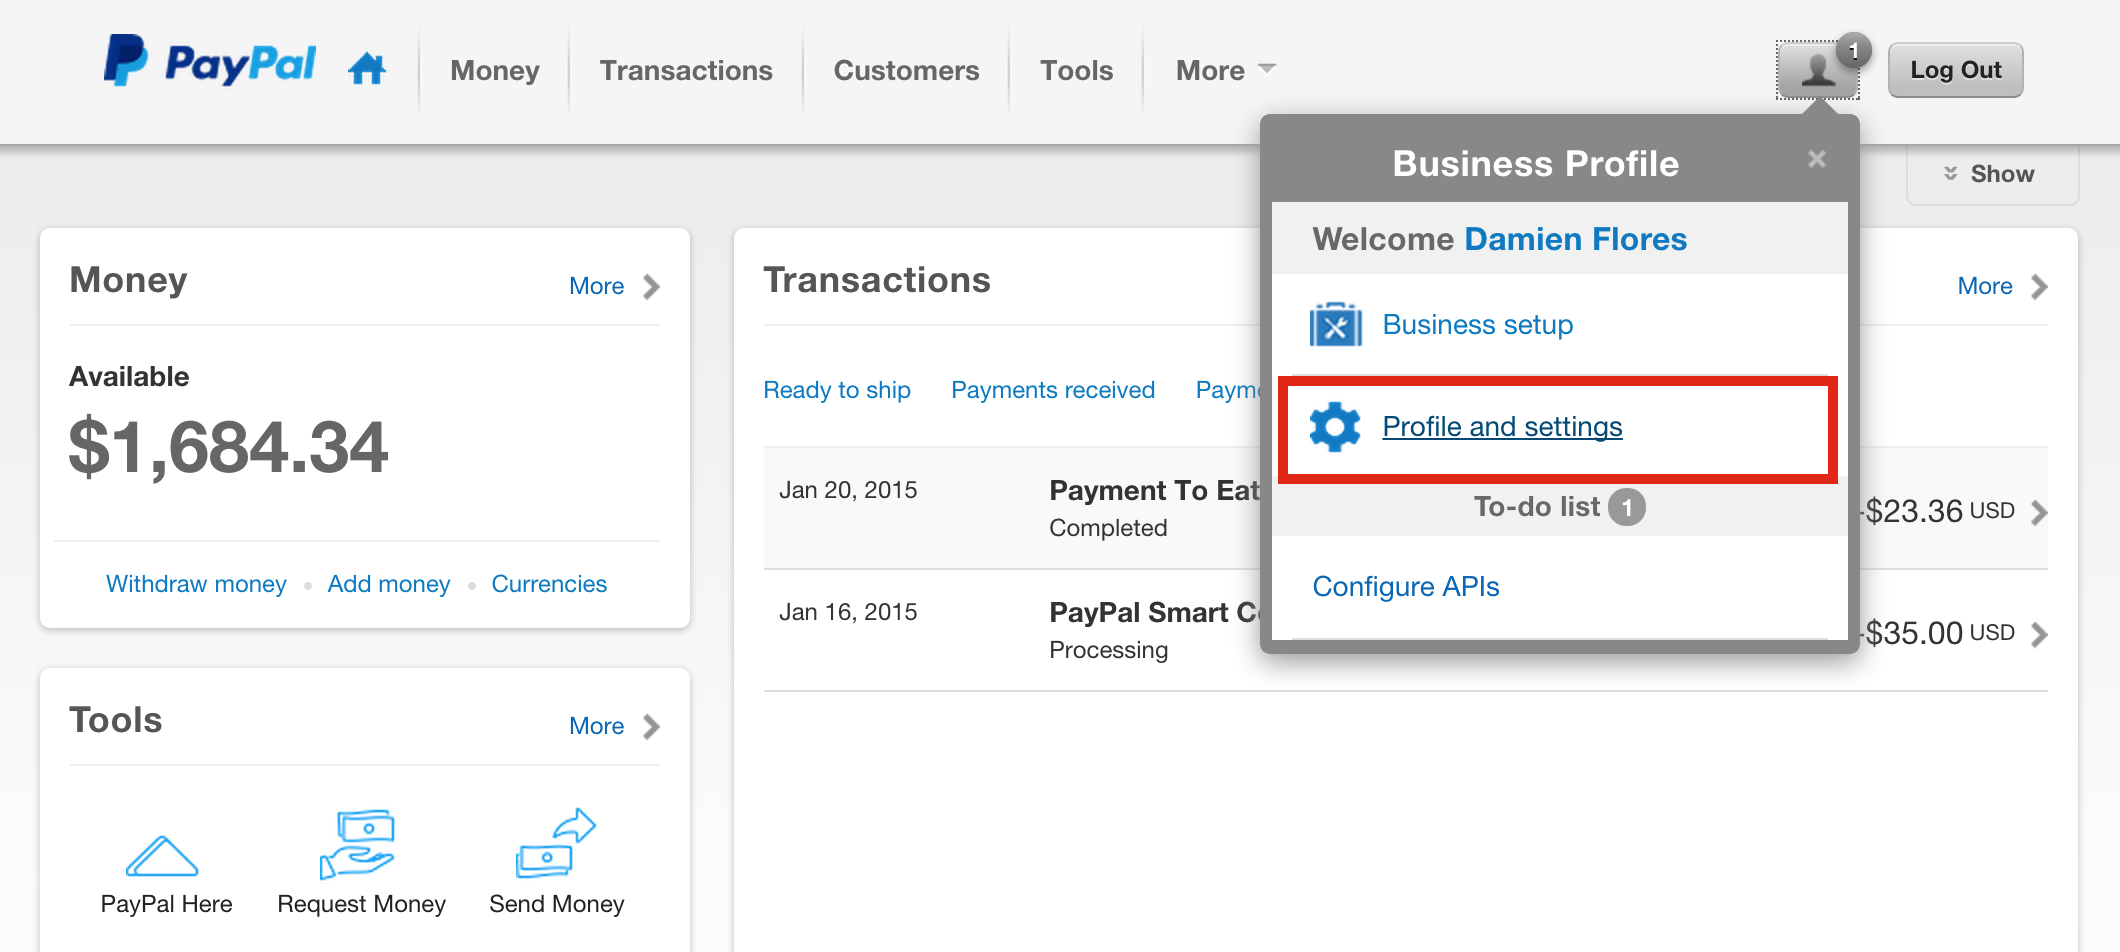
When using PayPal to process payments for your event, attendees should have the choice to pay using a credit/debit card or by signing up or logging in to their PayPal account. Signing up for a PayPal account shouldn't be required by default, but we recommend checking this setting to make sure your buyers can complete their purchase as smoothly as possible. To check this, log into PayPal, go to your profile and settings, and select "My selling tools." Then choose "Update" next to your "Website preferences" and make sure the "PayPal Account Optional" feature is turned on.
1. Go To Your Profile And Settings In PayPal
After logging in to your PayPal Premier or Business account, access the "Business Profile" menu in the top right and select "Profile and settings".
2. Select "My Selling Tools"
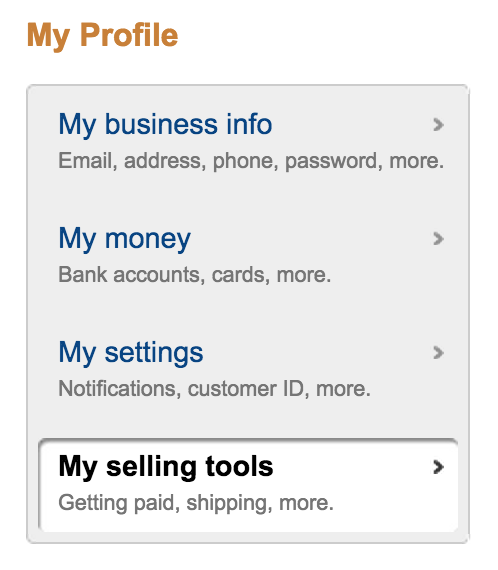
"My selling tools" is the last option in the menu on the left-hand side of the page.
3. Select "Update" Next To "Website Preferences"
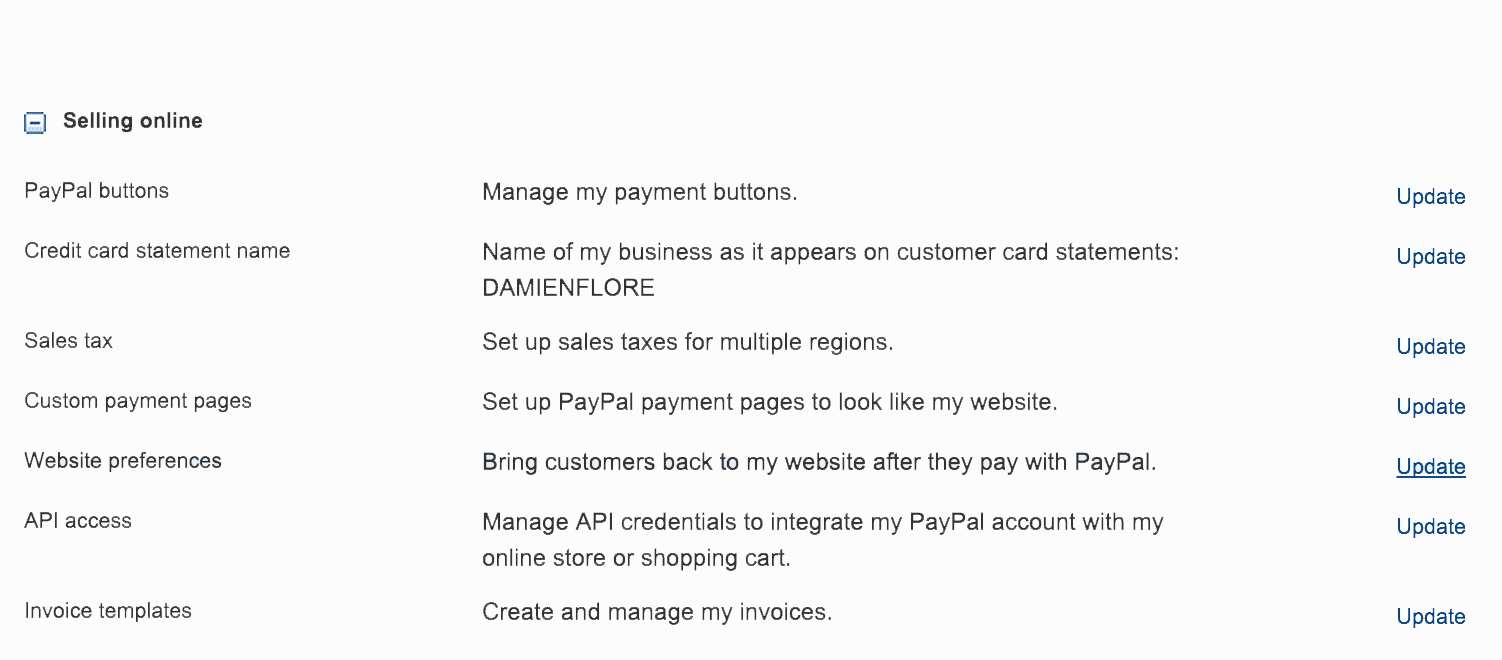
Under the group "Selling online," locate your "Website preferences" and choose the "Update" link.
4. Make Sure The "PayPal Account Optional" Feature Is Turned On
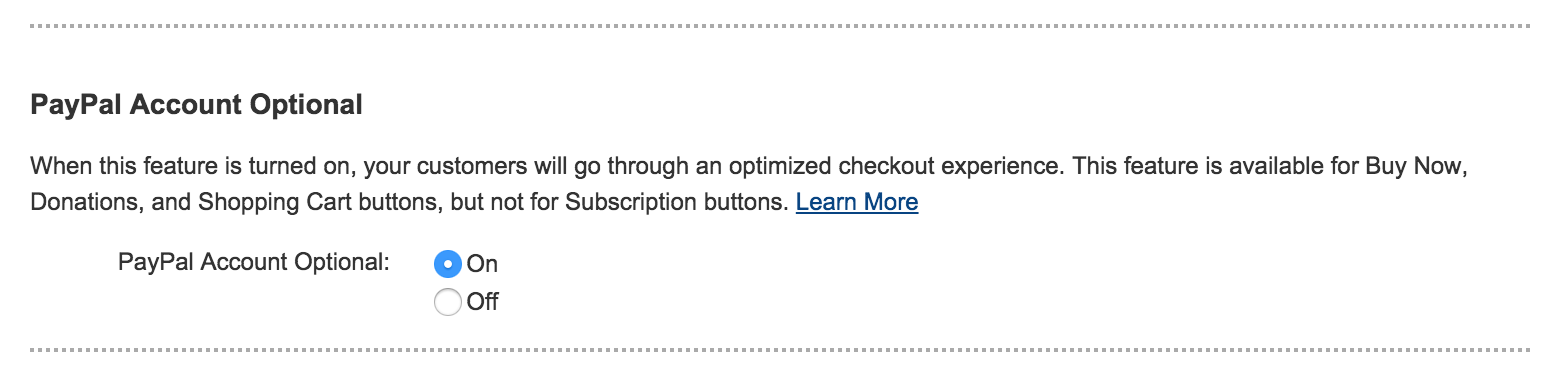
Scroll down to locate the section called "PayPal Account Optional." The feature is turned on by default, meaning attendees don't need a PayPal account to buy tickets—this is what you want!
5. Save Your Changes
Choose "Save" to save the changes to your website preferences. As attendees are registering on your event page, they will have the choice of signing in to their PayPal account or paying directly with a credit or debit card.
